Getting Nextcloud to work in Virtualmin with Nginx

First, copy this file into your web root directory and access it from your browser. Then, just replace your server block with the following right before you create an admin user and set up the database (replace [X.X.X.X], [mydomain], and [port] with your own info):

    server_name nextcloud.[mydomain].com www.nextcloud.[mydomain].com;
    listen X.X.X.X;

    listen X.X.X.X:443 ssl http2;
    ssl_certificate /home/[mydomain]/domains/nextcloud.[mydomain].com/ssl.combined;
    ssl_certificate_key /home/[mydomain]/domains/nextcloud.[mydomain].com/ssl.key;
    root /home/[mydomain]/domains/nextcloud.[mydomain].com/public_html;
    add_header X-Content-Type-Options nosniff;
    add_header X-XSS-Protection "1; mode=block";
    add_header X-Robots-Tag none;
    add_header X-Download-Options noopen;
    add_header X-Permitted-Cross-Domain-Policies none;
    add_header Referrer-Policy no-referrer;
    fastcgi_hide_header X-Powered-By;
    location = /robots.txt {
        allow all;
        log_not_found off;
        access_log off;
    }
    location = /.well-known/carddav {
        return 301 $scheme://$host:$server_port/remote.php/dav;
    }
    location = /.well-known/caldav {
        return 301 $scheme://$host:$server_port/remote.php/dav;
    }
    client_max_body_size 512M;
    fastcgi_buffers 64 4K;
    gzip on;
    gzip_vary on;
    gzip_comp_level 4;
    gzip_min_length 256;
    gzip_proxied expired no-cache no-store private no_last_modified no_etag auth;
    gzip_types application/atom+xml application/javascript application/json application/ld+json application/manifest+json application/rss+xml application/vnd.geo+json application/vnd.ms-fontobject application/x-font-ttf application/x-web-app-manifest+json application/xhtml+xml application/xml font/opentype image/bmp image/svg+xml image/x-icon text/cache-manifest text/css text/plain text/vcard text/vnd.rim.location.xloc text/vtt text/x-component text/x-cross-domain-policy;
    location / {
        rewrite ^ /index.php;
    }
    location ~ ^\/(?:build|tests|config|lib|3rdparty|templates|data)\/ {
        deny all;
    }
    location ~ ^\/(?:\.|autotest|occ|issue|indie|db_|console) {
        deny all;
    }
    location ~ ^\/(?:index|remote|public|cron|core\/ajax\/update|status|ocs\/v[12]|updater\/.+|oc[ms]-provider\/.+)\.php(?:$|\/) {
        fastcgi_split_path_info ^(.+?\.php)(\/.*|)$;
        set $path_info $fastcgi_path_info;
        try_files $fastcgi_script_name =404;
        include fastcgi_params;
        fastcgi_param SCRIPT_FILENAME $document_root$fastcgi_script_name;
        fastcgi_param PATH_INFO $path_info;
        fastcgi_param HTTPS on;
        fastcgi_param modHeadersAvailable true;
        fastcgi_param front_controller_active true;
        fastcgi_pass localhost:[port];
        fastcgi_intercept_errors on;
        fastcgi_request_buffering off;
    }
    location ~ ^\/(?:updater|oc[ms]-provider)(?:$|\/) {
        try_files $uri/ =404;
        index index.php;
    }
    location ~ \.(?:css|js|woff2?|svg|gif|map)$ {
        try_files $uri /index.php$request_uri;
        add_header Cache-Control "public, max-age=15778463";
        add_header X-Content-Type-Options nosniff;
        add_header X-XSS-Protection "1; mode=block";
        add_header X-Robots-Tag none;
        add_header X-Download-Options noopen;
        add_header X-Permitted-Cross-Domain-Policies none;
        add_header Referrer-Policy no-referrer;
        access_log off;
    }
    location ~ \.(?:png|html|ttf|ico|jpg|jpeg|bcmap|mp4|webm)$ {
        try_files $uri /index.php$request_uri;
        access_log off;
    }
Improve how Nginx Handles WordPress

This is still a work in progress, but adding the following lines to your nginx.conf file should improve the way that WordPress functions on your Nginx server.

Add these lines to your http block:

client_max_body_size 512M;
fastcgi_buffers 8 16k;
fastcgi_buffer_size 32k;
fastcgi_connect_timeout 300;
fastcgi_send_timeout 300;
fastcgi_read_timeout 300;
add_header Strict-Transport-Security "max-age=15768000; includeSubDomains" always;

Add these lines to each server block that is running WordPress. This should give your site an A+ mark for security on SSLLabs.com. Be sure to replace [X.X.X.X] and [mydomain] with your own info:

    location / {
        try_files $uri $uri/ /index.php?$args;
    }
    listen [X.X.X.X]:443 default_server ssl http2;
    ssl_certificate /home/[mydomain]/ssl.combined;
    ssl_certificate_key /home/[mydomain]/ssl.key;
    ssl_protocols TLSv1.2;
    ssl_session_cache shared:SSL:1m;
    ssl_session_timeout  10m;
    ssl_ciphers EECDH+CHACHA20:EECDH+AES128:RSA+AES128:EECDH+AES256:RSA+AES256:EECDH+3DES:RSA+3DES:!MD5;
    ssl_prefer_server_ciphers on;

I don’t think this has to do with running Nginx, but if you are getting a json parse error when you update a page and you are using the Gutenberg WordPress editor, try installing the Classic WordPress editor and see if that works better. The Gutenberg editor seems to still have some bugs.

Also, if you are getting a lot of white screens while in wp-admin, you probably need to increase your memory limit. Just add the following line to your wp-config file right above where it says ‘Thats all, stop editing!’, but make sure that the amount is not more than what is specified in your php.ini file:

define( 'WP_MEMORY_LIMIT', '128M' );

References

https://www.digitalocean.com/community/tutorials/how-to-optimize-nginx-configuration

https://www.scalescale.com/tips/nginx/502-bad-gateway-error-using-nginx

Fix: WordPress Memory Exhausted Error – Increase PHP Memory

Are you seeing an allowed memory size exhausted error in WordPress? This is one of the most common WordPress errors, and you can easily fix it by increasing the php memory limit in WordPress. In this article, we will show you how to fix WordPress memory exhausted error by increasing PHP memory.

What is WordPress Memory Exhausted Error?

WordPress is written in PHP, which is a server-side programming language. Every website needs a WordPress hosting server for it to function properly.

Web servers are just like any other computer. They need memory to efficiently run multiple applications at the same time. Server administrators allocate specific memory size to different applications including PHP.

When your WordPress code requires more memory than the default allocated memory, you get to see this error.

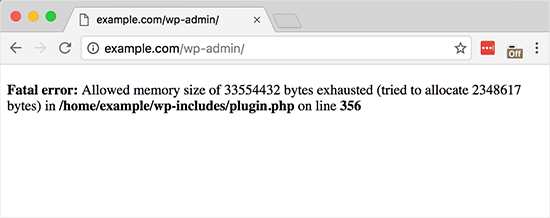
1Fatal error: Allowed memory size of 33554432 bytes exhausted (tried to allocate 2348617 bytes) in /home4/xxx/public_html/wp-includes/plugin.php on line xxx
Memory exhausted error displayed on a WordPress site

By default, WordPress automatically tries to increase PHP memory limit if it is less than 64MB. However, 64MB is often not high enough.

Having said that, let’s see how to easily increase PHP memory limit in WordPress to avoid memory exhausted error.

Increase PHP Memory Limit in WordPress

First you need to edit the wp-config.php file on your WordPress site. It is located in your WordPress site’s root folder, and you will need to use an FTP client or file manager in your web hosting control panel.

Next, you need to paste this code in wp-config.php file just before the line that says ‘That’s all, stop editing! Happy blogging.’

1define( 'WP_MEMORY_LIMIT', '256M' );

This code tells WordPress to increase the PHP memory limit to 256MB.

Once you are done, you need to save your changes and upload your wp-config.php file back to your server.

You can now visit your WordPress site and memory exhausted error should disappear now.

If you are new to WordPress, then take a look at our beginners guide on how to copy and paste code from the web.

We also have a step by step guide on how to find and edit wp-config.php file.

Note: If this solution does not work for you, then this means your web hosting service provider does not allow WordPress to increase PHP memory limit. You will need to ask your web hosting provider to increase your PHP memory limit manually.

That’s all we hope this article helped you solve WordPress memory exhausted error by increasing PHP memory limit. You may also want to see our step-by-step beginner’s guide to troubleshooting WordPress errors.

Reference

https://www.wpbeginner.com/wp-tutorials/fix-wordpress-memory-exhausted-error-increase-php-memory/

PHP-FPM settings tutorial. max_servers, min_servers, etc.

The other day, I was looking around for articles and tips on how to fine tune PHP FPM’s www.conf settings. To my frustration, the official documentation didn’t give any recommendations and there weren’t a whole lot of tutorials on the subject.

After wading through various discussions and blog posts, I managed to piece together the following information.

You need to know three things about your server before you change PHP FPM’s settings:

  1. How many cores does your server have?
  2. The amount of memory (RAM) on your server.
  3. How much memory does the average PHP process consume on your server?

How many cores does your server have?

To find out how many cores your server has, run the following command: echo Cores = $(( $(lscpu | awk ‘/^Socket/{ print $2 }’) * $(lscpu | awk ‘/^Core/{ print $4 }’) ))

When you run the Linux command above, you will get something like “Cores = 4”.

Jot that figure down because it’s important.

How much memory does your server have?

You should already know how much memory your server has. The real question here is: “How much memory do you want to give PHP?”

You have to take into account the fact that your server might be also running NGINX, Apache or MySQL. How much memory are these other processes consuming? If you have 8GB of RAM and the other processes on your machine are consuming 2GB, that leaves you with 6GB – or 5GB if you want to play it safe and leave some free.

Figure out how much memory you want to give PHP and jot that down. In my case, I had 4GB that I could allocate to PHP.

On average, how much memory does each PHP process consume?

This will depend on your application and your version of PHP. Older versions of PHP tend to consume more memory than PHP 7.

Run the command below to get a general idea of how much memory each PHP FPM process is consuming. ps –no-headers -o “rss,cmd” -C php-fpm7.2 | awk ‘{ sum+=$1 } END { printf (“%d%s\n”, sum/NR/1024,”M”) }’

Note that the command above above is looking for a process called php-fpm7.2. The PHP process on your server might be called something different. To find out the name of your PHP process, use the top command. When you run the top command, you will probably see one of the following processes:

  • php-fpm
  • php5-fpm
  • php7.0-fpm
  • php7.1-fpm
  • php7.2-fpm

When I ran the command above, I got 29M. i.e. Each php-fpm7.2 process on my server consumes about 29MB in RAM.

The configuration settings.

I now have three important pieces of information:

  • My server has 4 cores.
  • I can allocate about 4GB of RAM to PHP.
  • Each PHP FPM process on my server consumes about 29MB of memory. On older versions of PHP, you will probably see that each process consumes a lot more than that. I was reaching about 90MB per process when I was running the exact same application on PHP 5.5.

Now it is time to edit the www.conf file, which is situated in the pool.d directory. On my server, it was located at:

/etc/php/7.2/fpm/pool.d/www.conf

On your machine, the location might be slightly different.

There are 4 configuration values that we are going to change in the www.conf file:

  • pm.max_children
  • pm.start_servers
  • pm.min_spare_servers
  • pm.max_spare_servers

pm.max_children

To get a good value for this, you should take the memory that you want to allocate to PHP FPM and divide it by the average memory that is consumed by each PHP FPM process.

In my case, I want to allocate 4GB (4000MB) and each process consumes about 29MB.

Divide 4000 by 29 and you get around 138.

So I set pm.max_children to 138.

If you have 8000MB to spare and your PHP consumes about 80MB per process, then that will be: 8000 / 80 = 100.

pm.start_servers

For pm.start_servers, I multiply the number of cores that I have by 4.

4 x 4 = 16

So I set pm.start_servers to 16.

If you have 8 cores, then it will be: 4 x 8 = 32.

pm.min_spare_servers

For pm.min_spare_servers, multiply the number of cores that you have by 2.

In my case, that is 2 x 4 = 8.

So I set pm.min_spare_servers to 8.

pm.max_spare_servers

For pm.max_spare_servers, multiply the number of cores on your server by 4.

On my machine, that is 4 x 4 = 16.

So I set pm.max_spare_servers to 16, the same value that I used for pm.start_servers.

Restart PHP FPM.

For these changes to take affect, you will need to restart PHP FPM. Below, I have included a number of service restart commands that might apply to your setup. Select the correct one and run it. sudo service php-fpm restart sudo service php5-fpm restart sudo service php7.0-fpm restart sudo service php7.1-fpm restart sudo service php7.2-fpm restart

Anyway, hopefully you found this guide useful!

Reference